
How to Setup and Install AVerMedia Live Gamer 4K (GC573) Capture Card [with Low Bandwidth fix]
The AVerMedia Live Gamer 4K (GC573) is an internal capture card capable of passthrough and capture of resolutions up to 4K 60 FPS in High Dynamic Range. It can also record and passthrough higher framerates at lower resolutions. Here is how to set up and install it.
You will need:
-a desktop computer
-a vacant PCIe x4/x8/x16 slot on your motherboard
-a GC573 capture card
-a source to capture from (such as a console)
-a screwdriver
-two HDMI cables
The screwdriver you need will depend on your PC's case. If you built it yourself, you'll just need what you put it together with. If pre-built, you'll have to look it up manually, but most cases can be opened with Philips screwdrivers.
The GC573 comes with one HDMI 2.0 cable. Game consoles such as the PS5 also come with HDMI cables. You will need to use the HDMI 2.0 cables to capture at the highest resolutions and frame rates. IF your console can output 4K 60 FPS, the HDMI cable is should be 2.0 as well.
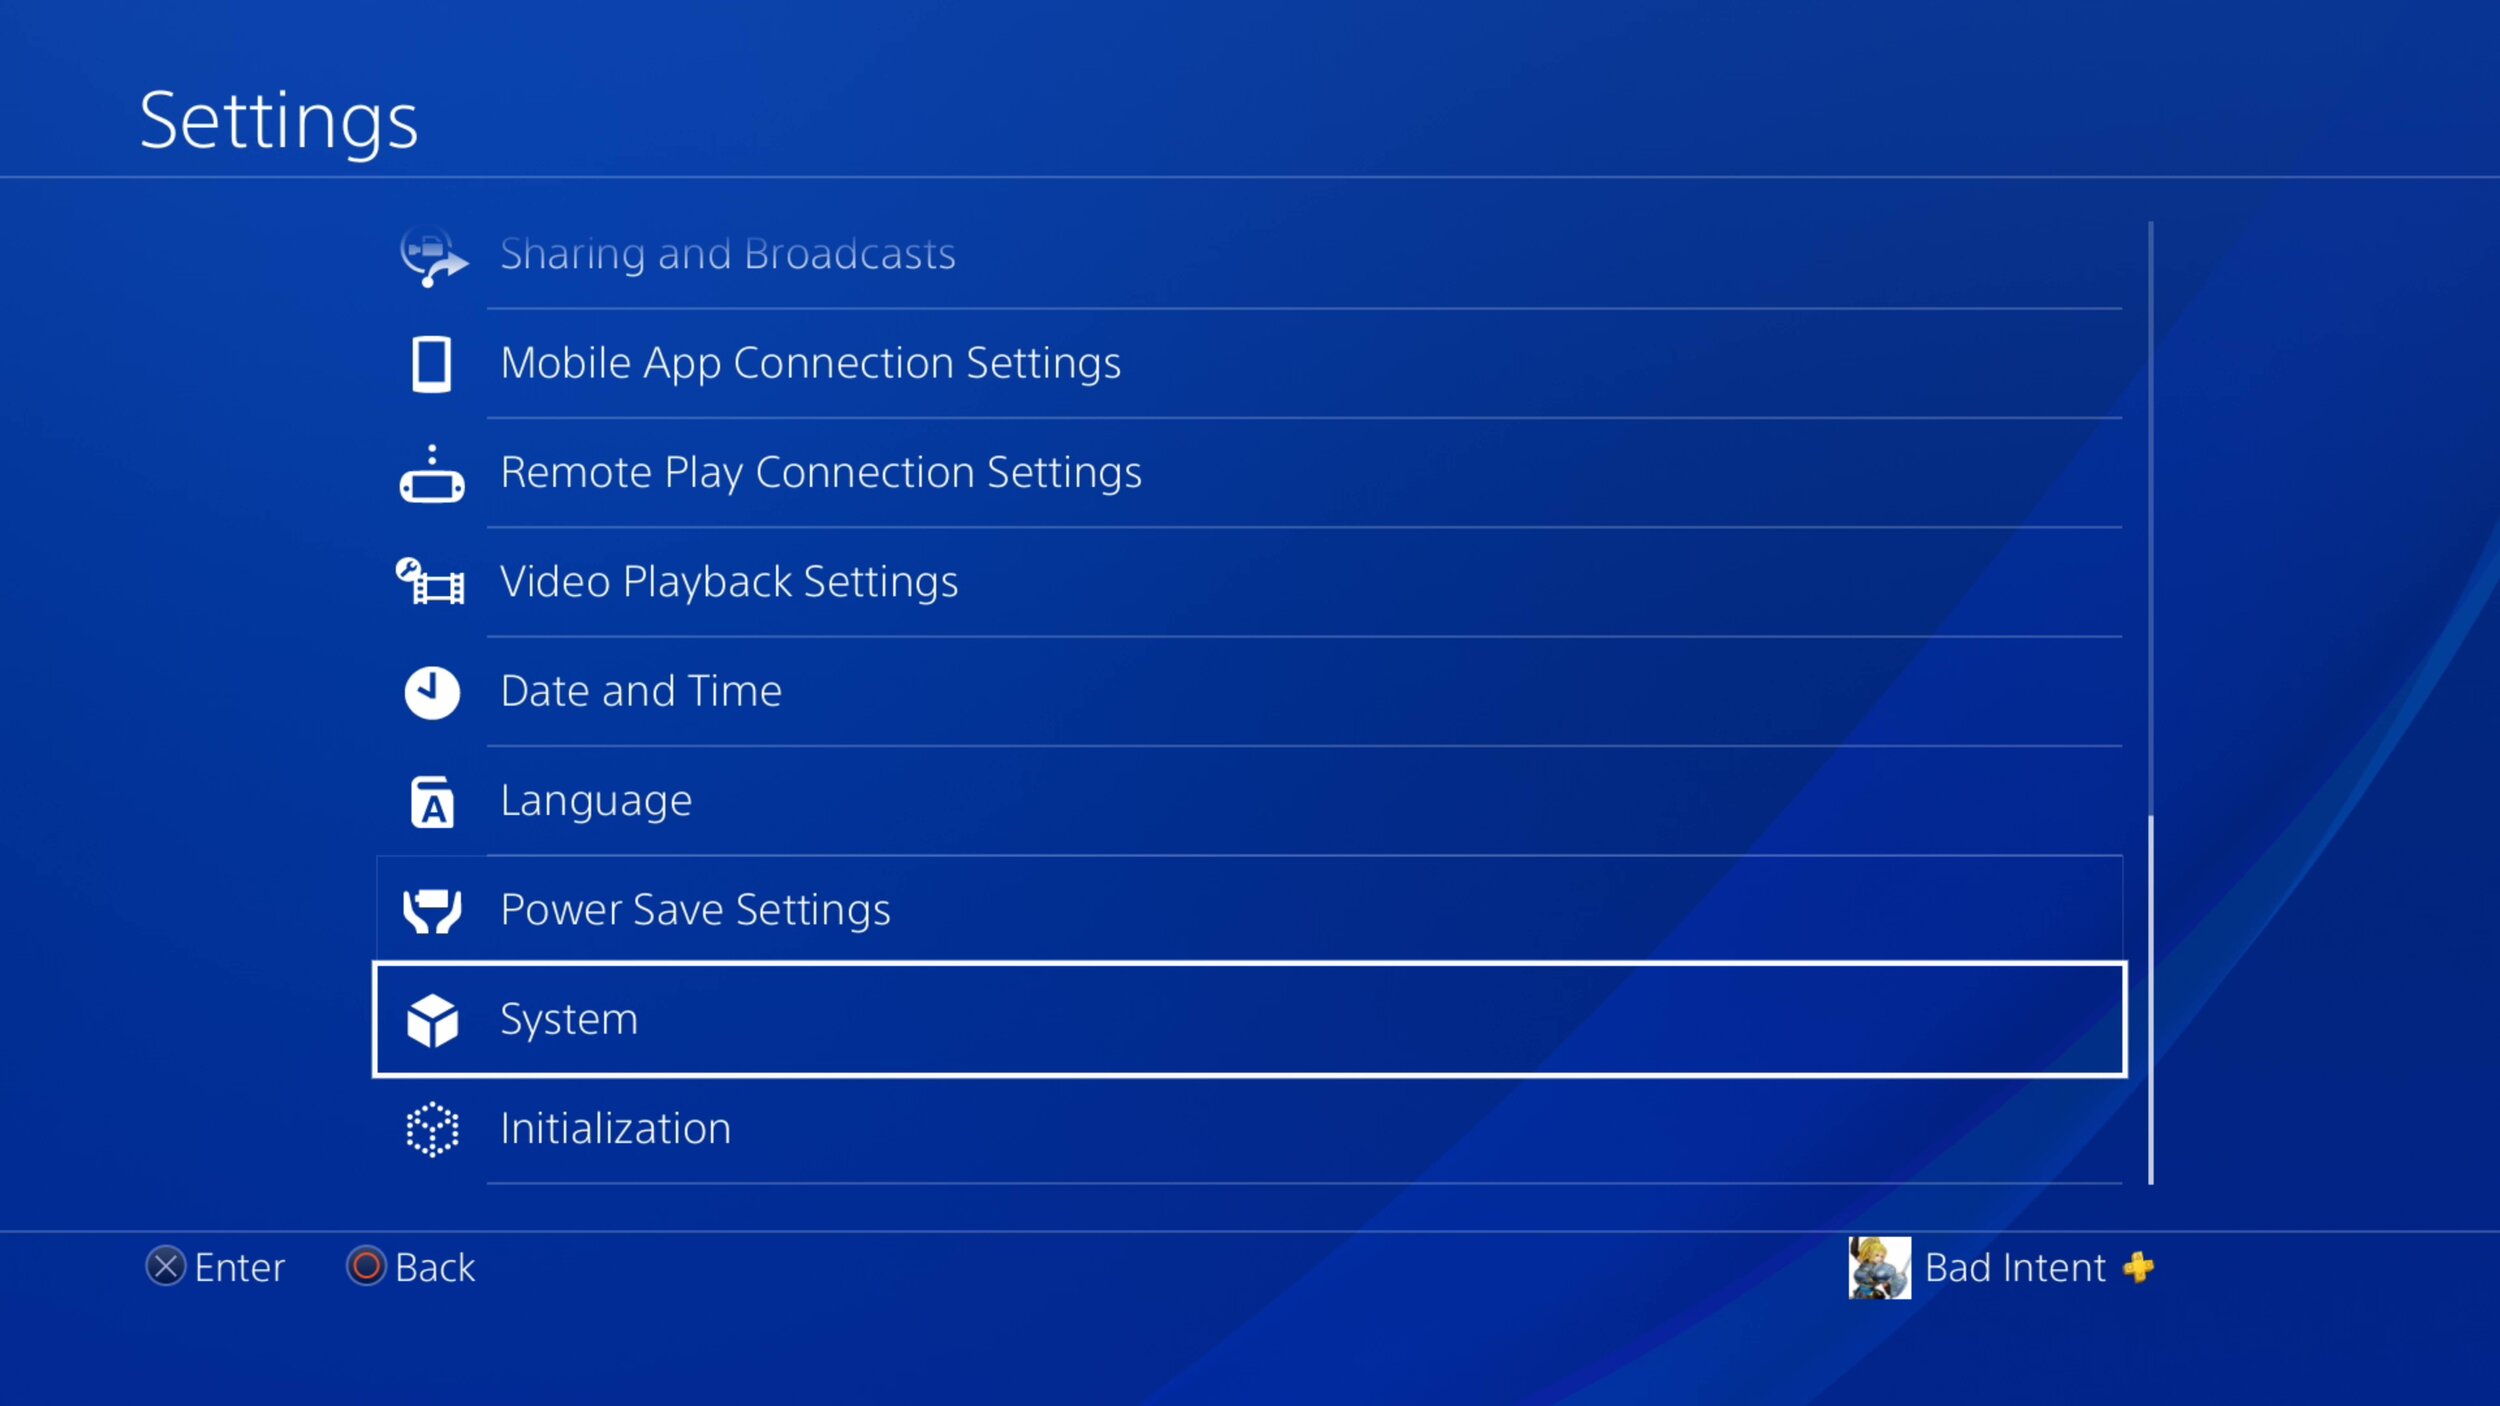
Step 1. Disable HDCP from the source you want to capture from. (Consoles)
Most consoles come with High-bandwidth Digital Content Protection enabled by default. This prevents recording of copyrighted multimedia such as movies and TV shows from the console. Disabling this allows for game capture through a capture card, but disables multimedia playback until you turn it back on.
Disabling HDCP can be done in the settings menu of your console. For example, on the PS4 Pro, go to the home menu > Settings > System > Enable HDCP. Untick that box.


Step 2. Physically install the capture card.
The GC573 connects directly to the motherboard of a computer. To do this, first shut down your computer, turn the I/O switch to off, and remove the plug to the power supply unit. Discharge static electricity from your body by touching an unpainted metal portion of your case as an extra precaution.
Remove the front panel of your computer and remove the bracket in the back that lines up with the empty PCIe port you will attach your capture card to. Save the screw that you remove.
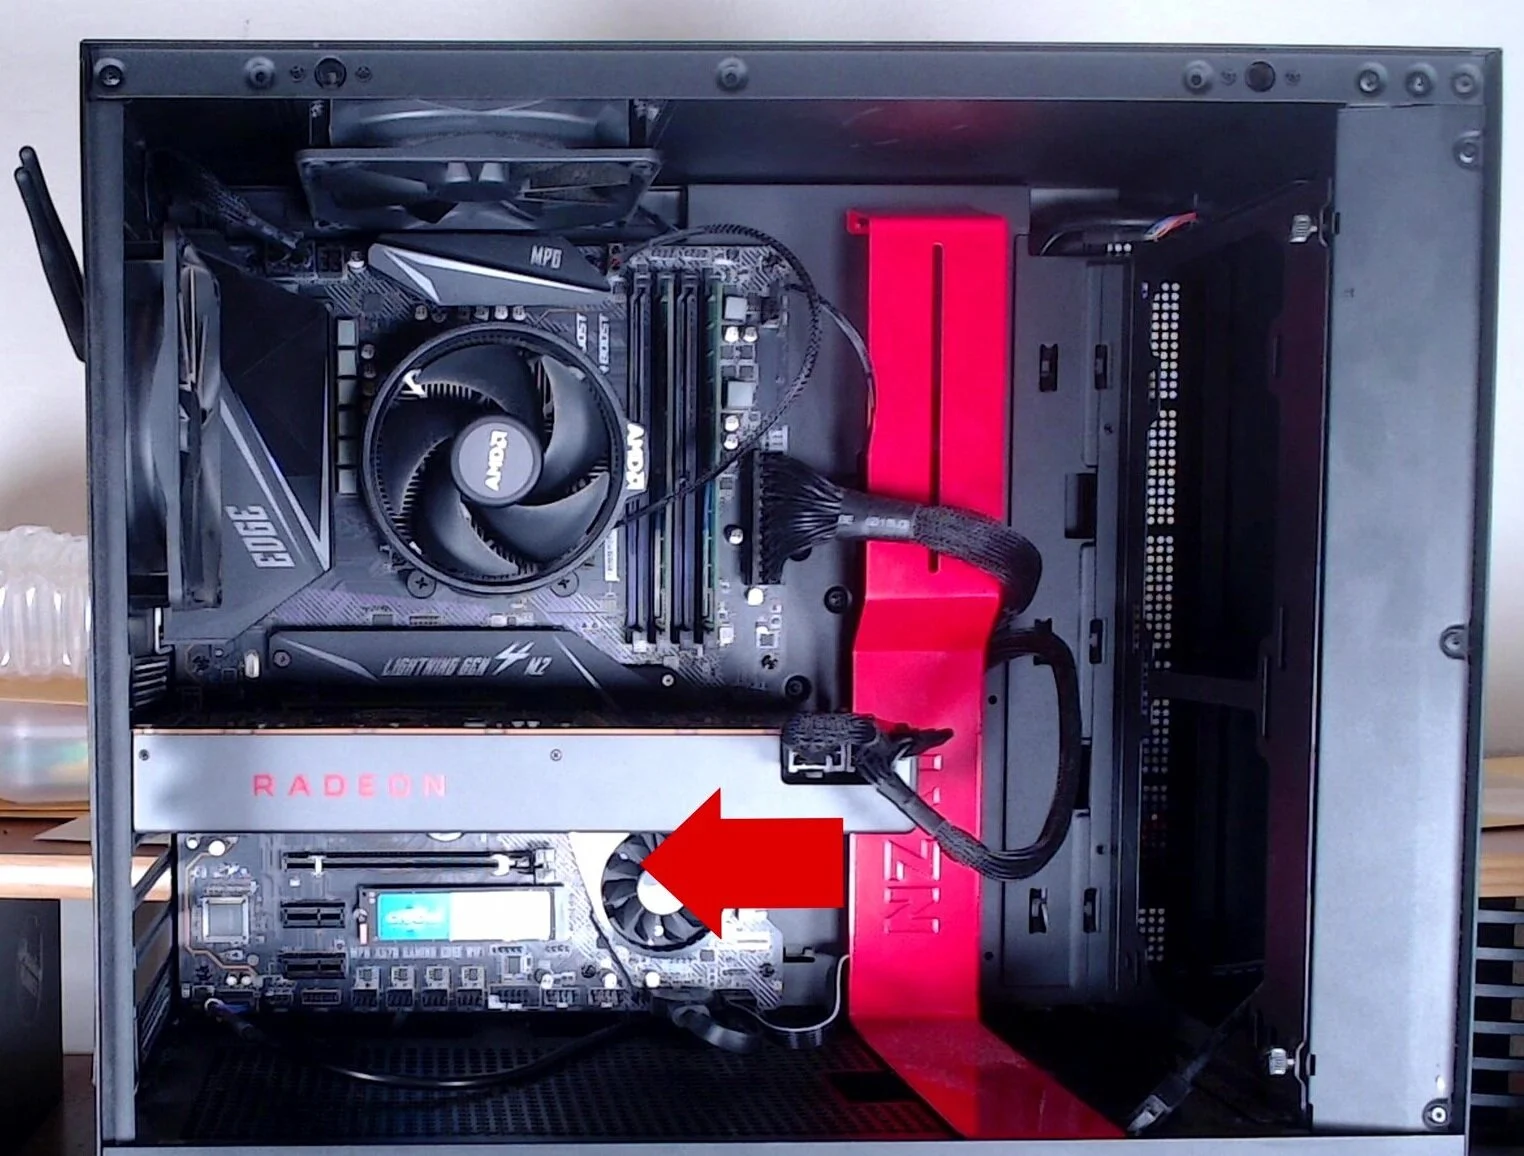

Line up your capture card so the HDMI in and out ports line up with the space from the bracket you removed, and gently push the card into the PCIe slot. Don't jam it in, but it should be inserted fully. At this point it will still be hanging down a bit, so it must be screwed into place.
Take the screw that you saved when removing the bracket and use it to screw the AVerMedia Live Gamer 4K into place. Replace the front panel, plug the cable to your power supply back in, and turn the I/O switch back to on. You can now turn your computer back on to download and install the AVerMedia software.
Step 3. Install and open AVerMedia's RECentral software.
Download RECentral and the required drivers from AVerMedia's website here. Install both the driver and the software and run REcentral.

Software download.

Drivers download.

RECentral 4.
Step 4. Run RECentral bandwidth test.
Before plugging in your capture source, this step can save you a lot of time and headache. Click the gear on the upper left, then click your card and run a bandwidth test by clicking the icon next to the big circle.


The goal is to fill the circle and get "O"s across the grid. In particular, if you want to record 4K 60 FPS in HDR, you’ll need to click the drop down under where it says “Supported Encoder”, and click P010. You should have an “O” at 3840x2160. If you do, proceed to step 5. If not, skip down to the extra step at the bottom to maximize your bandwidth.
Step 5. Connect your console (or other source) to the capture card.
Plug one end of an HDMI cable into the device you'll be capturing from. Plug the other end into the HDMI IN port of the GC573. Plug another HDMI cable into the monitor you intend to play on, and plug the other end of that cable into the HDMI OUT port of the capture card.

HDMI cable going from the console to the IN port on the GC573.
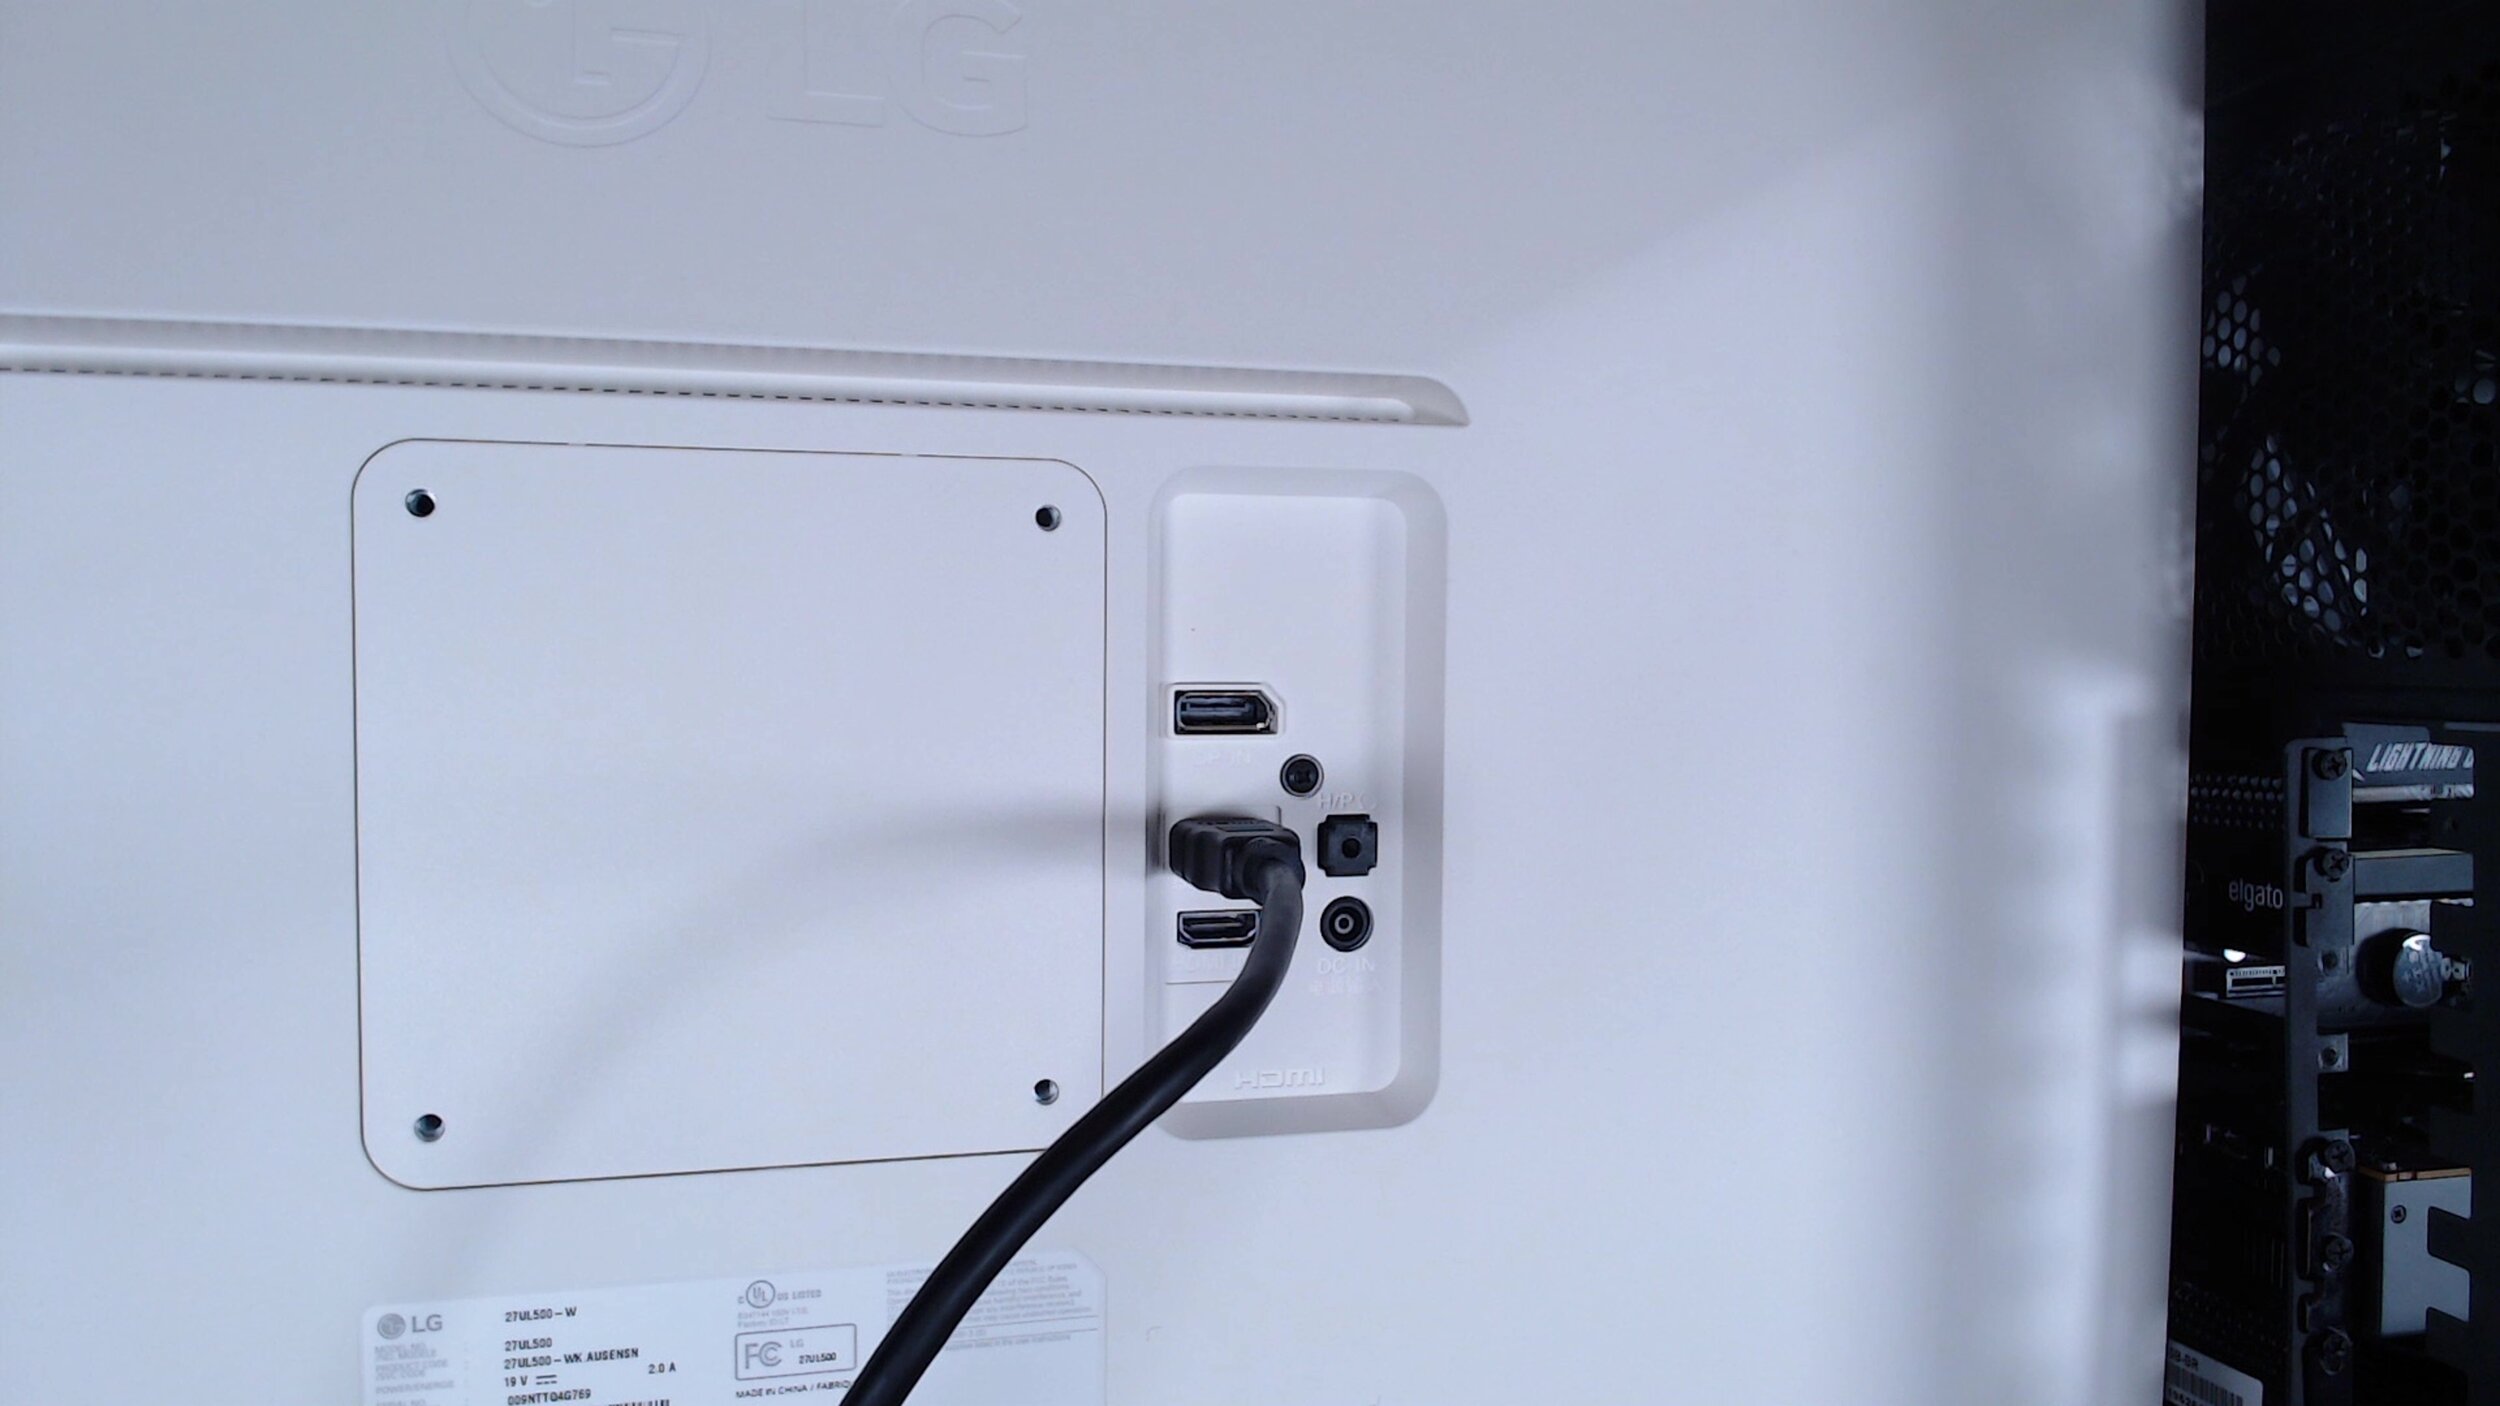
HDMI cable going from the monitor to the out port of the GC573.

In this image, the IN port is on the left, and the OUT port is on the right.
If your console isn't already on, turn it on and you should see your footage in both the RECentral software and on the monitor you're passing the footage through to. In RECentral you can now choose between different frame rates and resolutions.

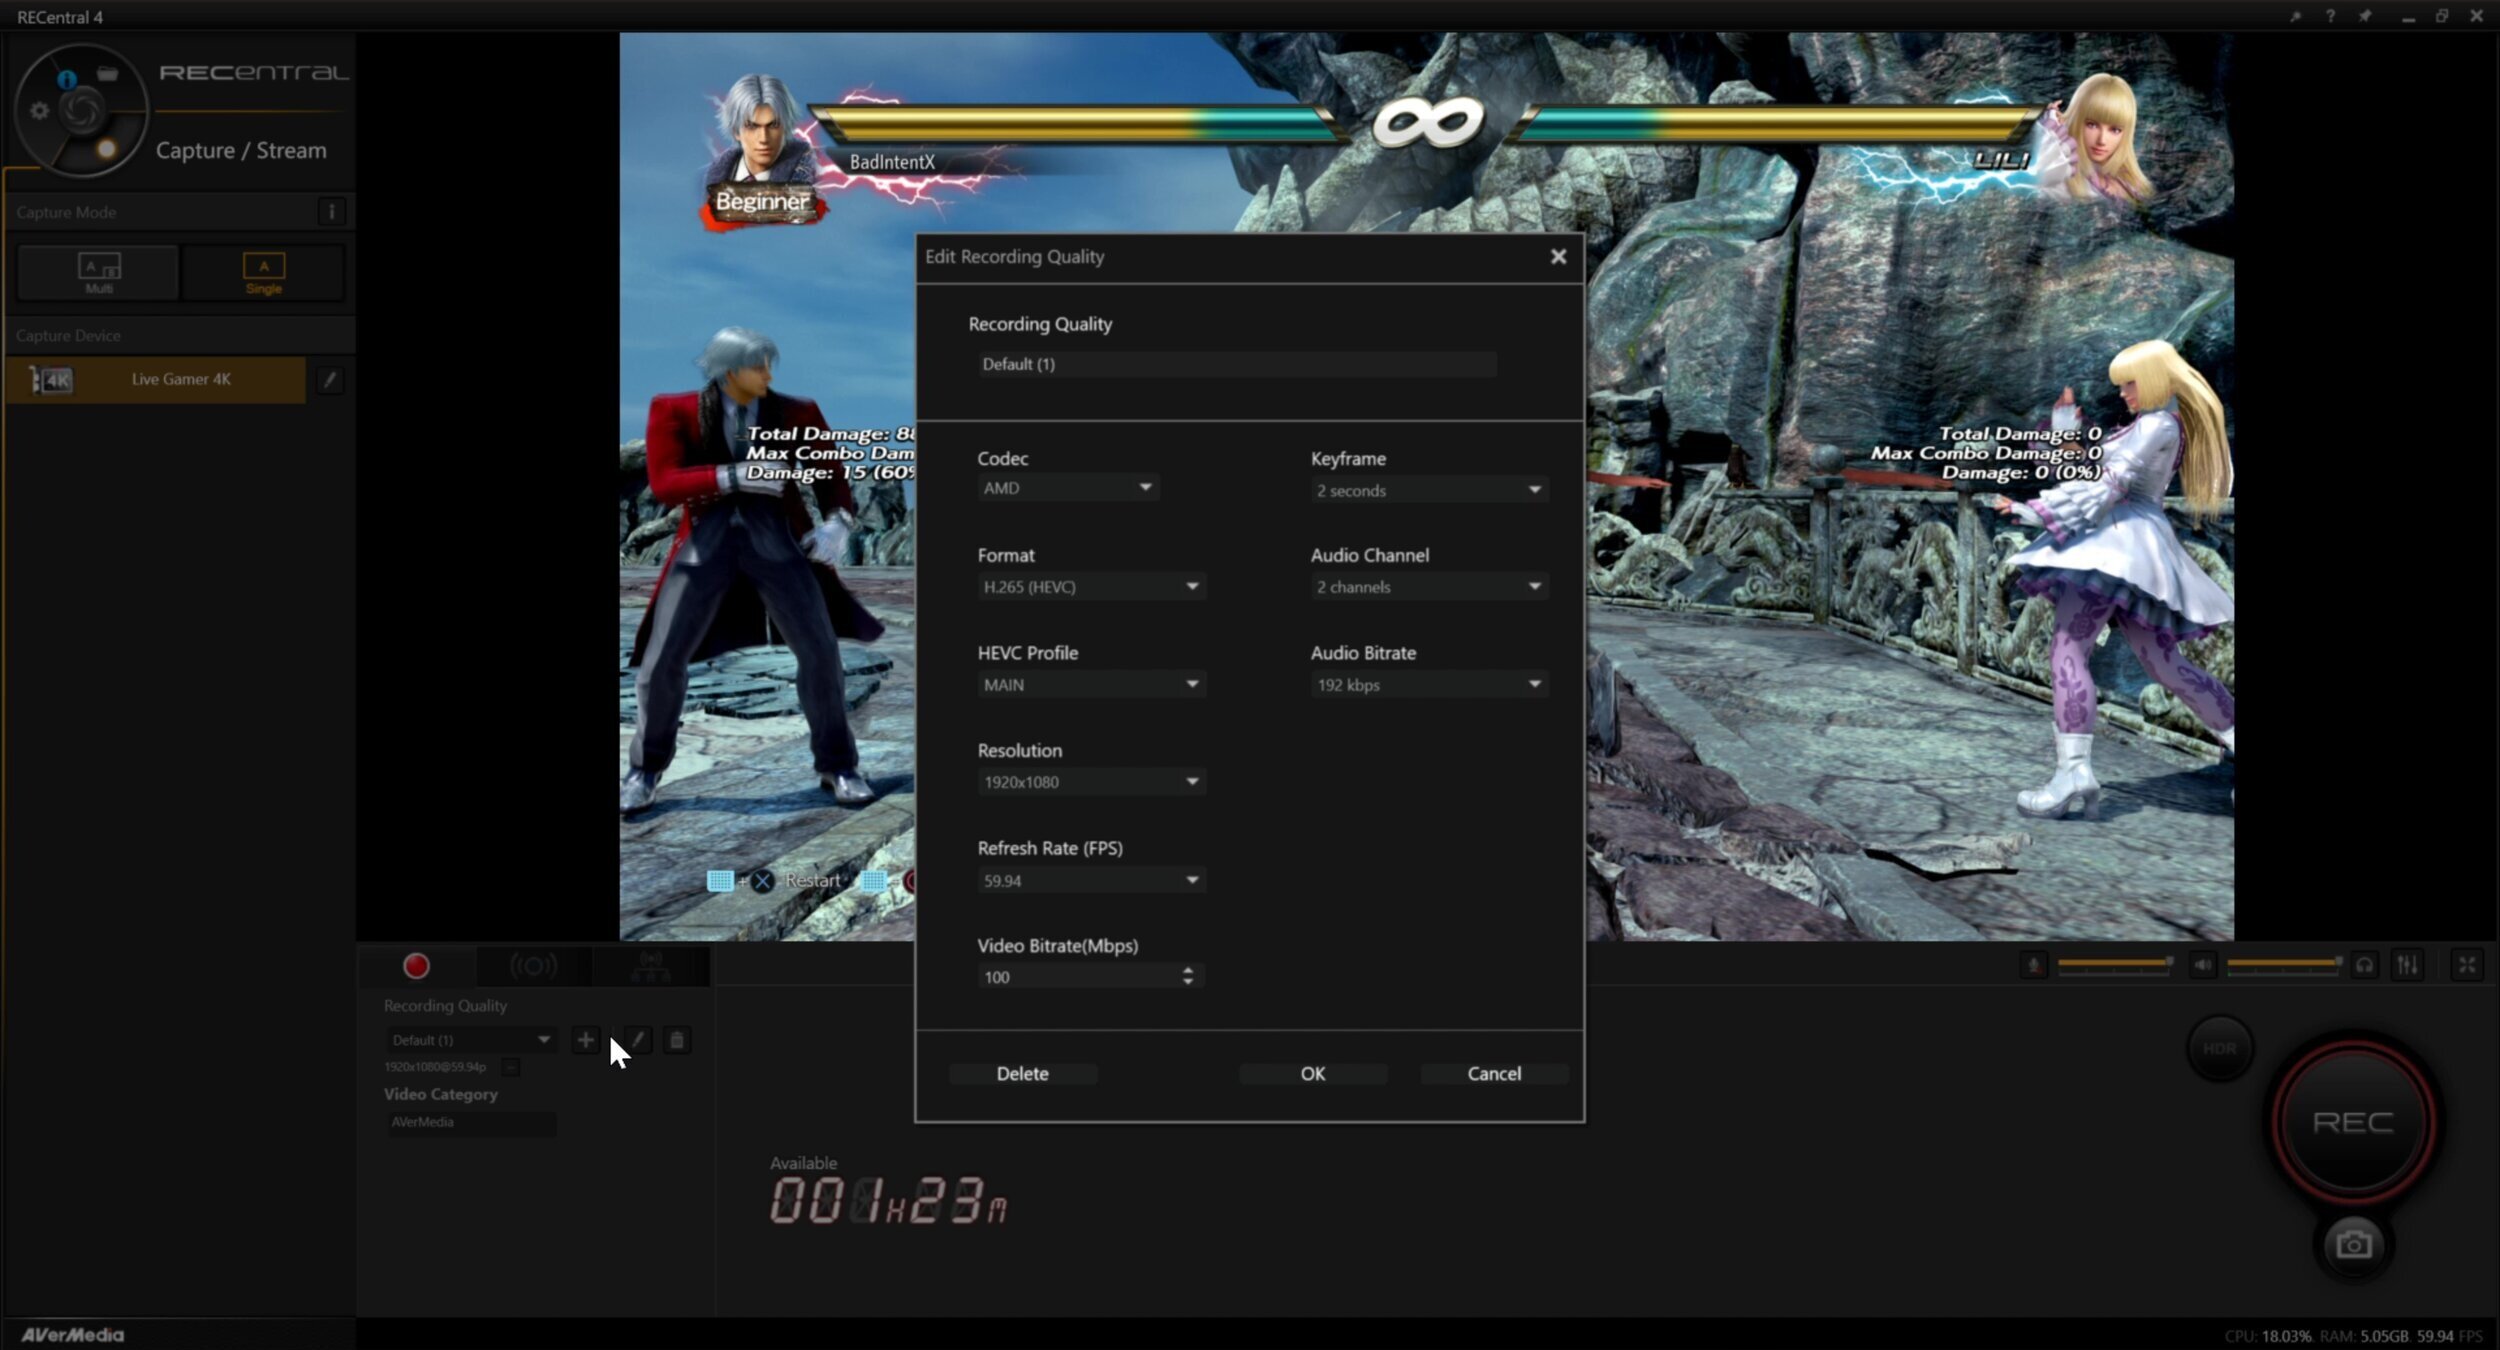
To change the recording frame rate and resolution, click the pencil under “Recording Quality”.
Recording in High Dynamic Range (HDR)

Click your capture device on the left and select P010 under Decode Format.

On the bottom right, click the HDR icon.
Step 6. Send capture card footage to other software.
To do this, first close RECentral. The AVerMedia Live Gamer 4K can only be used in one program at a time. Then, open OBS and add your capture card as a video capture device. Make sure the resolution and frame rate are set correctly, as it might default to lower values than you want. You can even use this footage in other apps like Zoom. This is useful if the device you’re recording from is a camera.


Extra step: Low bandwidth / low FPS detected fix

If your computer failed the bandwidth test or you get a “low FPS detected” message in RECentral, the simplest fix is to insert your capture card into a different PCIe slot. Usually, your graphics card will be occupying your PCIe x16 slot. If you have an extra x16 or x8 slot, try that first. If not, you'll have to swap your graphics card into the x4 slot and out your capture card into the x16 slot.
Make sure both devices are properly secured and proceed back to step 4 to ensure you can record at 4K 60 FPS in HDR. If you ignore this step, you may get dropped frames in both RECentral and in other applications like OBS.

Motherboard: MSI MPG X570 Gaming Edge Wifi. PCIe x16 slot on top, x4 on bottom.
Summary
Here’s how to set up the AverMedia Live Gamer 4K (GC573):
1. Disable HDCP from the source you want to capture from. (Consoles)
2. With PC off and unplugged, connect capture card to a PCIe x4 port.
3. Install and open AVerMedia's RECentral software.
4. Run RECentral bandwidth test.
5. Connect your console (or other source) to the capture card.
6. Send capture card footage to other software.
7. If you failed bandwidth test, change to a different PCIe port.